Hisense makes great reliable TVs that last a long time. But as is the case with all electronic devices, they can malfunction sometimes.
If your Hisense TV wont turn on for some reason, this article will guide you through detailed troubleshooting steps to get to the bottom of the issue and possibly fix it.
Try power cycling the TV to quickly fix your Hisense TV that won’t turn on. Unplug the TV from the wall, push & hold the power button for 60 seconds, plug the TV back in and turn ON.
This quick power reset should fix most TVs that won’t turn on due to residual electrical charge build-up in different components. Pressing the power button for 60 seconds, drain that charge and refresh the circuit.
However, if your Hisense TV is refusing to turn ON because of more serious software or hardware-related issues, you will have to go through this detailed troubleshooting guide below.
This is a troubleshooting guide. We won’t discuss component repair instructions or get too technical so that everyone can understand this.
Hisense TV wont turn ON – Possible reasons
Your Hisense TV is a complex machine that has different parts working in unison to put a crystal clear picture on display.
This unison is often disturbed by a software or hardware malfunction that renders your TV useless.
Main parts of Hisense TV
Before we jump into troubleshooting, let’s briefly discuss the main parts that make up your TV. As promised, this won’t get too technical but will help you better understand your issue.

Knowing these parts is important because their malfunction causes specific symptoms, and knowing which part is faulty makes troubleshooting really easy.
Here are the main parts of typical LCD TV.
POWER SUPPLY: A circuit board on the back side of your TV (just below the cover) provides the necessary voltage to the main control board or motherboard.
It has different capacitors and other components that usually go bad, resulting in malfunction.
MOTHERBOARD: This is the main part of any TV that processes the video received from outside and sends signals to the timing control board (TCON board).
It rarely malfunctions, but when it does, you will have to replace it completely.
TCON BOARDS: Timing Control boards are located on the edge of the LCD panel, either at the bottom or top. They control the vertical and horizontal lines produced on your TV to make an image.
One TCON board controls half the screen. So when one TCON board goes bad, you will get picture on one half of the screen only.
BACKLIGHT: Backlights are either CCFL tubes (older technology) or LED strips located behind the LCD screen. Their purpose is to illuminate the image. They go bad pretty frequently.
Now that we have a good idea of the main parts of a typical TV let’s see some of the signs of common malfunction in a Hisense TV.
Hisense TV problems & possible causes
| Signs of malfunction | Possible reasons |
|---|---|
| TV won’t turn ON – no standby light | 1. Power circuit failure (cord, wall switch) 2. Power board is fried |
| TV won’t turn ON – standby light flashing | 1. Power supply is malfunctioning 2. External voltage supply is low |
| TV won’t turn ON – standby light solid | 1. Power supply is malfunctioning 2. TV control board is unresponsive to control buttons. 3. Remote is not working/dead batteries |
| TV turns ON – audio is coming, but no video | 1. TV backlight is fused 2. Bad TCON board |
| TV turns ON but very dim picture on screen | 1. TV backlight array is fused |
| TV turns ON but only half screen is black | One of the TCON boards is faulty. |
| TV turns ON but there are horizontal/vertical lines | 1. Bad TCON board. 2. LCD ribbon panels are damaged |
| TV turns ON with logo but shuts off again | Power supply is faulty |
Hisense TV not turning ON – Troubleshooting
As I said at the beginning of the article, this is more of a troubleshooting guide than a repair guide. I have kept it as simple as possible so that every reader can understand.
Below are 8 different troubleshooting methods you can use to identify the problem. Once identified, you can try to fix it on your own or get help from a professional repair center.
If you are a bit of a DIY person, do the simple steps and try fixing it yourself first before you can get help. That way, you might be able to save a few hundred bucks of repair cost.
1. Check the power circuit
For any electronic device that won’t turn ON, this should be your first step. If your Hisense TV is not turning ON, first check if it is receiving power from the wall.
You would be surprised to know that half of the problems are due to a cord that is cut or loose or a wall socket that is short.
A simple but thorough check can save you a lot of money and headache.
First of all, check the wall socket and see if it is providing the required current. Doing that is really easy – just get another appliance, plug it into the same socket, and check if it is working. It can be a juicer or your vacuum cleaner, or any other thing.
You can also check the power using a voltage tester. It is clear if your wall socket is running the other appliances or showing a voltage.

Next, check your TV power cord for any visible cuts or breaks. Power cords are notoriously unreliable.
Usually, when the wall socket and the plug don’t make good electrical contact, they become hot and end up damaging the plug or the socket (or both)
Check the power cord for any signs of aging or damage. If you find any, that means you have to replace your cord before you can do any further troubleshooting.
A clear sign of power circuit failure is that you won’t get any signs of life on your Hisense TV. There will either be no light, or the light will be flickering/flashing, indicating an insufficient power supply.
2. Power cycle your TV
If your power circuit is working fine, the next troubleshooting step is to power cycle your Hisense TV and see if it was malfunctioning due to irregular electric charge build-up.
Power cycling is basically a fancy word for turning your TV OFF & ON again. But unlike simple OFF/ON, we make sure to drain the circuit of the electrical charge during the process so that the system reboots fresh.
Running your TV through a power cycle can remove temporary bugs and restarts your TV fresh.
To power cycle your Hisense TV follow the below steps:
- Unplug the TV from the wall socket.
- Wait for 20 – 30 minutes to let the TV cool down.
- Find the power button on the back side of the TV and press & hold it for 60 seconds.
- Plug your TV back in and turn it ON.
What does power cycling do exactly? You might be wondering.
Your TV is basically a collection state machine with different components with 0 or 1 state. Capacitors, flipflops, logic gates, etc all work together to output the programmed results (video on your screen)
When your TV is in use for a long time, it will occasionally run into a combination state which makes the whole system unstable. In simple language, we call it a “bug”.
When you run your TV through a power cycle and drain all the capacitors off their stored charge, the system is basically reset to its zero states, where all the systems are stable and will reboot fresh.
That’s how power cycling will eliminate all the “bugs” that the system has developed over time.
3. Check your Remote
Sometimes, the problem is not your TV but with your remote controller.
If you see a standby light ON on your TV, but it is not responding to your remote button input, it is possible that your TV remote is not working.

To troubleshoot your remote, go through the following steps.
a. Replace remote batteries
First of all, get a new fresh pair of batteries and replace your existing ones. This seems like a no-brainer but many people will look elsewhere for the problem when it is actually dead batteries.
Always remember not to mix old and new batteries as that will create more problems due to mismatch in cell voltages. Always replace the old batteries with a fresh pair.
Once the new batteries are in, check if you can turn your Hisense TV on now.
b. Clean your Remote
Remotes get in all sort of places like below your sofa cushion, under the sofa and in one of my cases, in the lawn under the bushes (thanks to my dog).
The remote picks up dirt and dust over time. This dust accumulates between the rubber buttons and the circuit board and prevents contact between the two and hence your remote button won’t work.
Cleaning your remote is quite easy. There are not many moving parts in your remote. All you have to do is open the screws, remove the cover and clean the underneath of the bottom and the circuit board.
Also, clean the remote’s battery compartment as it may also accumulate dust and dirt.
After a thorough cleaning, put everything together exactly as you opened it and screw in the cover.
c. Check your remote IR sensor
This is an easy check to see whether your remote is producing signals. Almost all remotes have an IR blaster LED on the front end that produces infrared light when buttons are pressed,
This Infrared light is not visible directly through the naked eye, but your phone camera can record it, and you can playback the recording to see the light.
To do this, turn your room lights OFF and point your remote directly at your phone camera, press a few buttons, and record a video while doing so.
After you record the video, play it back and look for flashes of dim red light in your recorded video.
If you see the IR flashes, that means your IR sensor is good and working. If not, the IR LED is dead and will need a replacement.
d. Power cycle your TV remote
Just like your TV, your remote can also go into an unstable state where it will stop working correctly.
To fix this, you have to power cycle or power reset it to give it a fresh start. This will remove any temporary bugs or malfunctions.
To power cycle your Hisense TV remote, remove the batteries, press & hold your power button for 30 seconds to drain any residual charge from capacitors. Put the batteries back in and try your remote.
4. Remove all external devices
If you have power cycled your TV and your remote but you are still unable to power on your Hisense TV, the next step would be to remove all external devices to make sure they are not the troublemakers.
Smart TVs are connected to various external devices, including a TV box, LAN connection for the internet, gaming consoles via HDMI, and maybe a streaming device like Amazon firestick.
Although these devices seldom cause problems but is a good idea to eliminate them as suspects.
One by one, remove all your external devices and make sure the only wire connected to your TV is the power cord.
Now, try to turn ON your TV and see if you are getting a static screen or menu option. Any kind of display or sign of life is good at this point as it confirms your TV is not totally broken after all.
5. Check external video source
Sometimes, your TV is fine, but it’s the video source that is not working properly.
Most users rely on a number of devices to run their Hisense TV. I use a Roku stick for streaming which connects to my TV via HDMI.
If you are using an external video source, it is a good idea to check it and see if it is working alright.
The quickest check would be to disconnect all devices and put your Hisense TV in Live mode, where it can get signals from the Live TV source.
Even if you don’t have a Live TV connection, you will still get static and confirm your TV is okay.
If your TV is alive and showing even static, that means your external video source is faulty. It’s good to switch to another source while you figure out what is wrong with the current one.
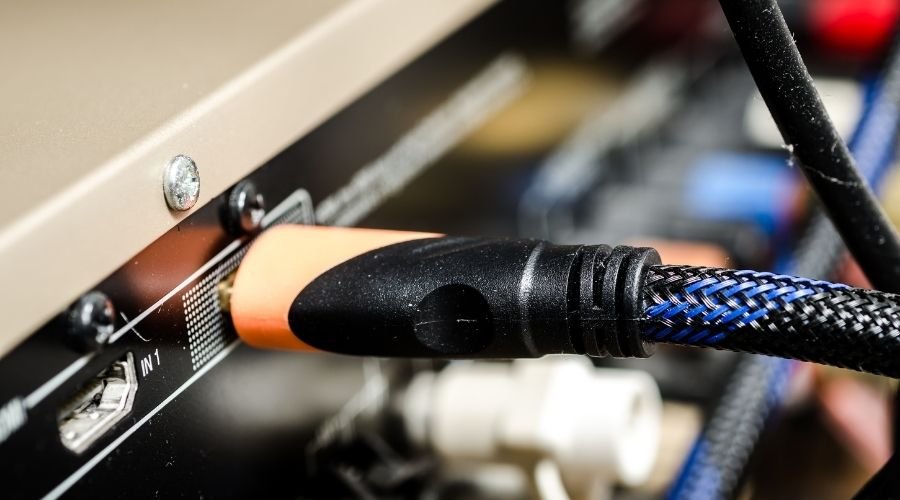
In most cases, an HDMI or VGA cable is at fault . You can change them with new one and see if that solves the issue.
6. Factory reset your TV
Factory reset will revert your Hisense TV back to its factory state and remove any and all custom configurations, apps and accounts.
Factory reset is usually done to remove any software glitches from your TV’s firmware and give it a new start. It is quite easy to perform.
Most Hisense TV models have a RESET button or hole on the back side near the Antenna input or at the end of the inputs panel. It is also labeled as “Reset” (see image below)
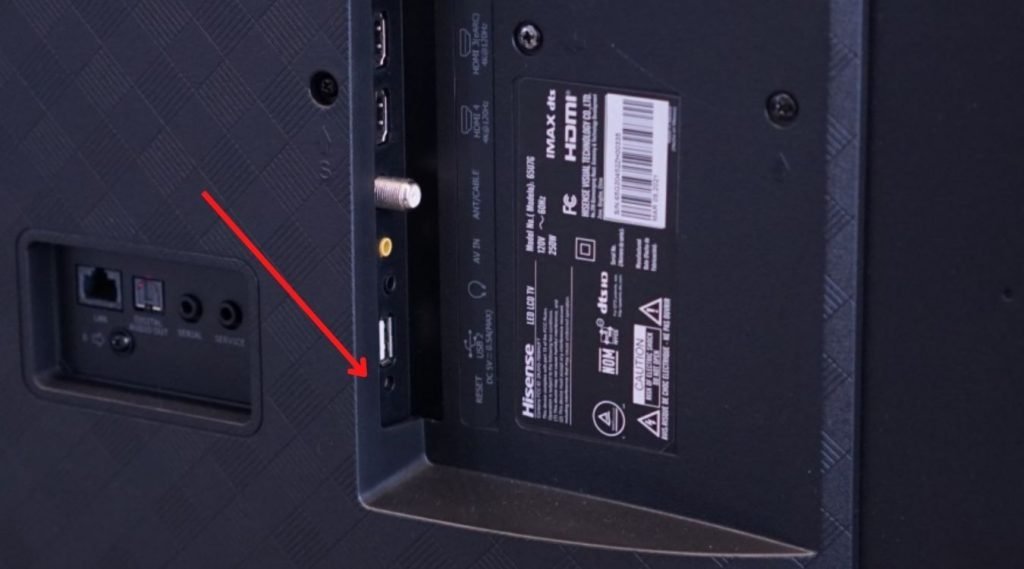
On some models, it’s a reset button that you can push with a finger, while on others, it’s a small pinhole that you can push with a pin.
Either way, push the reset button for 30 seconds while the TV is plugged in. After 30 seconds, your TV should reboot itself, and you should see the Hisense logo on the screen .
If this hard reset also doesn’t solve your problem, it’s probably a hardware issue. We are going there next, so keep reading.
7. Check TV circuit boards for shorts
If nothing has worked so far in your troubleshooting efforts, it’s time to get a little more hands-on and remove the back cover.
Don’t worry. We are not going to do any actual repairs. We are just looking at some components and trying and see if any of them have visible signs of damage.
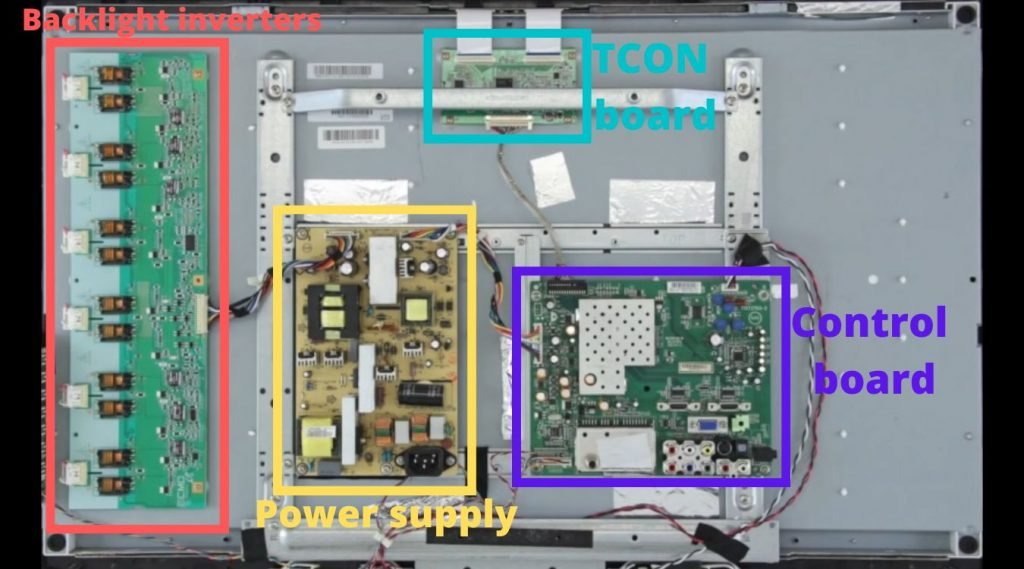
Place your TV face down on a soft surface (your bed or a tabletop with a towel beneath). Open up all the screws on the back cover and carefully remove the back cover.
Once the cover is removed, perform the below checks to see if you can find any abnormalities.
a. Check for blown capacitors heads
In any electric circuit board, capacitors are most prone to electrical damage. A slight surge in voltage can fry them.
Capacitor heads will bulge out when they are blown and are clearly visible upon inspection.
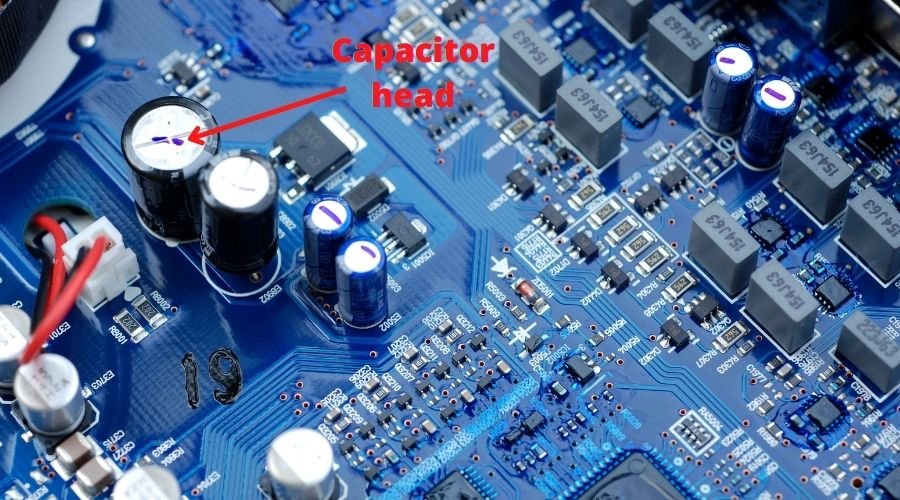
On the back of your Hisense TV, you will find capacitors on the power supply board. Closely inspect these capacitors and see if their heads are flat or bulged out.
If any of the capacitor’s head is bulged out, that means it is fried and needs to be replaced. This is also the most probable cause of your Hisense TV not turning ON.
b. Check for burn marks or scorching
Apart from the capacitors, also check for any signs of burn or scorching on the circuit board.
When a circuit board element shorts, it produces a high temperature before it fully blows and melts away. This shorting sometimes leaves a visible burn mark on the circuit board.
Look closely for any black marks around the main components. The short circuit element also leaves a distinct smell of burning, so you can smell around the board and try to find any short circuit element.
c. Check for shorts using a thermal camera
A more sophisticated way of finding a short-circuited element is to use a thermal camera and see for any hotspots while the TV is plugged in.
The thermal camera picks up abnormally high-temperature zones on the board, which are usually a sign of a short circuit.
However, not everyone owns a thermal camera. They are quite expensive, but if you have one lying around, you can use it.
You can also find a mobile phone mount thermal camera for a few hundred bucks. FLIR ONE makes great thermal camera units that you can attach to your iPhone and scan anything.
d. Check for lose connections
Another visual check you can do is to look for any sort of loose or broken connection between the boards and the screen.
When you open the back cover, you will see a few cables running between the different boards and to/from the screen panel. Just quickly check and see if any of them is loose or cut.
If you find one such connection, it might be the cause of your Hisense TV malfunctioning.
Here is a good video of inspecting the TV board and replacing faulty components.
8. Check for faulty backlights
All modern displays are backlit using either CCFL (Cold Cathode Florescent Lamps) or LED arrays. CCFL tubes are a bit older technology compared to modern LED TVs.
Like any light bulb, these light sources can go bad. Especially if you have an older model of Hisense TV that uses CCFL tubes, it has a higher chance of fusing.
Moden LED backlit TVs are more reliable, but they to go bad from voltage surges and prolonged use.
Checking for faulty backlights is quite easy; you don’t have to open your TV cover.
One clear sign of a bad backlight panel is that you will get sound, but you won’t see a picture on your screen.
To confirm this, just turn ON your TV, dim your room lights and point a flashlight at your TV screen from a few-inch distance. You will see a very dim picture and words on your screen.
This indicates that your TV is working fine, and it’s just the backlight panel that is not illuminating the picture on the screen.
However, fixing your backlight is not an easy task if you are not a DIY person. You will have to order the exact type of backlight panels and replace them.
If you are not a technical person, your best chance is to take your TV to a repair shop and let the professional do it correctly.
Here is a good video explanation of how to do this backlight check properly using a flashlight.
Contact Hisense support
As a last resort, you should contact Hisense support and see if they can give you any suggestions to get your TV fixed.
If you are based in the US, you can talk to the support team during these support hours.
- Monday-Friday: 9AM – 9PM EST
- Saturday-Sunday: 9AM – 6PM EST
For Tablets & TVs, the support telephone number is 1.888.935.8880
Hisense TV Troubleshooting – Conclusion
Hisense TV troubleshooting is not an easy task, but if you follow the steps outlined in this article, you can get to the bottom of your issue in most cases.
To summarise the discussion above:
- First of all, check if the TV is getting adequate power from the wall.
- Run your TV through a power cycle to resolve any bugs
- Check your remote and make sure it is working
- Remove all external devices to see if they are the problem
- Check if the external video source is working fine
- Try factory resetting your TV
- Open the back cover and check the circuit board for any shorts
- Check if your TV LCD backlight is ON and working
After running through all these troubleshooting steps, if you get your TV working, great. If not, you should then contact the Hisense technical support team for advice and suggestions.
Frequently Asked Questions
TV is not turning on and making a clicking noise. Why?
The power supply unit of your TV is faulty. The clicking sound is coming from the electronics in the power unit when it tries to turn on but can’t.
Hisense TV is turning on with the logo but shuts off again. Why?
One of the capacitors in the power supply unit is blown, and the control unit is not getting adequate power voltage during booting. As a result, it turns off midway.
Why is my Hisense TV blinking red light?
The common cause of Hisense TV blinking red light is because it is not getting enough voltage from the wall. Check your mains supply.
Why Hisense TV red light blinks 2 times?
The red light blinking 2 times before it turns off is a sign of a faulty power supply and blown capacitor heads. Open the back cover and confirm.
What’s the difference between LCD and LED TV?
LCD TVs are backlit using fluorescent lamp (CCFL) tubes, while in LED TVs, the LCD panel is backlit using an array of LEDs. So, an LED TV is just an LCD TV with LED backlighting.