Beats Solo 3 are very reliable headphones with solid build quality and software. However, at times, your headphones might not turn on, and you might get a little worried (ok, a lot worried as they are 200-dollar headphones)
But the good news is that you can revive your seemingly dead Beats Solo 3 headphones with a few simple troubleshooting methods.
The most common cause of Beats Solo 3 not turning on is either a dead battery or a malfunctioning power button. Software glitches and hardware damage can also be the reason.
If you follow this troubleshooting guide to the bottom, you will be able to turn on your Beats Solo 3 again and enjoy great music. So, let’s jump in.
Check battery charge level
The first thing we are going to do is check if the Bests Solo 3 battery has enough charge to turn on.
If the battery is empty from using the headphones or if they have been on the desk unused for a long time, they are not going to turn on.
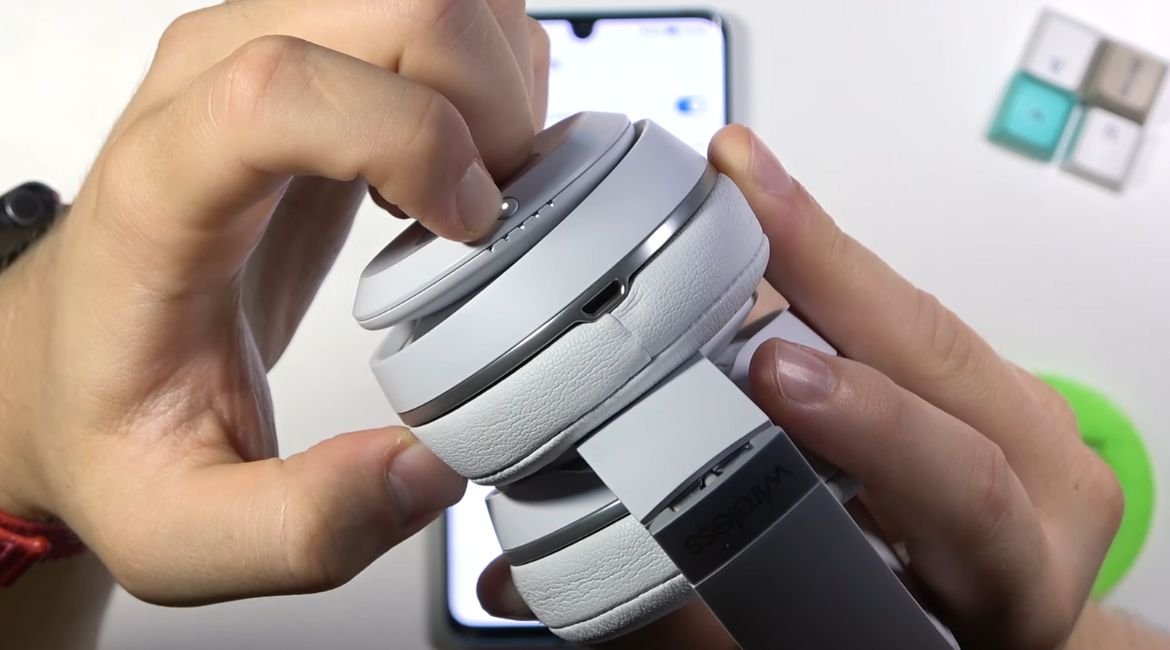
To check the battery level, press and see if you get any LED lights activity on the headphones. If you don’t see the LED lights coming on, the battery might be fully drained.
Plug in and leave the headphones on charge for at least 3-4 hours and see if the headphones turn on. I have also written a detailed troubleshooting guide if your Beats Solo 3 are not charging.
If the headphones are charging and you see LED activity, but you still can’t turn it ON, we have a few more troubleshooting steps to perform below.
Power button might be faulty
The power button on your Beats Solo 3 is a weak link when it comes to hardware malfunction. It can get damaged with constant use, dirt, and humidity.
If your Beats Solo 3 has been in use for a long time, it is a good idea to clean the button. Over time, dirt particles can seep inside the button and accumulate under the surface where the button makes contact with the circuit.
You don’t need to open your beats to clean the button. There is a simple trick with WD40 contact cleaner.
WD40 is a famous versatile cleaning spray that removes dust, dirt, and rust from metal surfaces and can be used to clean electronic circuits as well..
If your Beats Solo 3 headphone is not turning ON due to accumulated dirt and dust under the button contact surface, it needs a thorough cleaning with a WD40 spray.
- Go to an open spot in your house or outside where you can use the spray freely.
- Hold the button side upwards in your hand and gently but thoroughly spray the WD40 from all sides.
- Use the included straw with your WD40 can to direct the spray accurately.
- Once done, push the button 20-30 times to get the solvent under the button and clear out any debris or dirt.
- Leave the headphone to dry for an hour and then power it on.
The WD40 spray is safe to use with electronic connections as it is non-conducting and doesn’t cause a short circuit as water does.
It will clean the contact surface and evaporate itself. I have tried this trick successfully on my Beats X earbuds when the button was not working.
Hard reset
Sometimes a software bug or glitch can stop your headphones or earbuds from working. In such a case, a hard reset or factory reset can get your headphones working again.
To hard reset, your Beats Solo 3, press and hold the POWER + VOLUME DOWN button simultaneously for 10 seconds till you see the charging light start flashing. After that, release the button and wait for the headphones to restart.
After the headphones restart, plug it back in and see if the charging issue is resolved. Hard reset can solve other common software issues as well so its a handy troubleshooting method.
Check for water damage
Like any other electronics, water can potentially damage Beats Solo 3 headphones as well.
It is recommended to avoid exposing the headphones to water or other liquids as much as possible to prevent damage. If the headphones do get exposed to water, it is recommended to dry them off immediately.
If your Solo 3 headphones have been in a water accident and refused to turn on afterwards, it is possible that you have fried the delicate circuitry inside.
A water damage circuit needs thorough examination to isolate and replace the shorted components. You will need a professional repair person for this.
Check for physical damage
Just like water, a drop from height can also damage the internal circuitry. Try to remember if you have recently dropped your headphones from your tabletop? If yes, that might be the reason.
Also keep in mind that your headphones might stop working days, weeks or even months after a potentially damaging drop. This is because the drop might weaken the internal wiring which will further deteriorate and finally break off as time pass by.

If you think you have dropped your headphones recently, checking for internal wiring damage is a good idea. You can gently open the headphones and check for any visible damage.
One common issue with almost all over-the-ear headphones is that there are a couple of wires going from one earmuff to the other earmuff. These wires are prone to wear & tear because of the contestant movement of the headband.
If one or more wires break down, you will face issues like lost sound in one ear or your Beats headphones might simply refuse to turn on. You can open it up and inspect the wires.
If you are not a DIY person, you can take it to a professional repair shop or contact apple support.
Replace battery
If your Beats Solo 3 has been in use for a long time and you noticed a gradual decrease in its run time, the battery has a good chance of dying.
Its time to replace its battery with a new one. The new battery will not only revive your dead headphones but will also give you great play time. You can easily find a replacement battery on Amazon (link)
Replacing the battery is easier than it sounds. Here is the step-by-step process
- Open the headphone cover on the side with the charging port and power button. Be careful with the wires inside.
- Once the cover is off, you will see the battery. Carefully pull out the battery plug from the slot.
- Now, with the help of a sharp tool, pull out the battery by removing the adhesive tape at the bottom.
- Install the new battery the same way and plug it into the slot.
- Install the top cover, and you are done.
Here is a short video demonstration of Beats Solo 3 battery replacement.
Contact Apple support
If nothing has worked so far and you Solo 3 headphones are still not charging, perhaps its time to call up the big boys and ask for repair or replacement (if you are under warranty)
Apple offers free battery replacement if you have Apple Care+ for your headphones and the battery capacity drops below 80%.
To get started with the process, visit their dedicated beats repair & service page.
Note: Apple repair is notorious for its high service charges. If you don’t want to pay a high price, you can simply go to your nearest repair shop or look for a repair site online like this one.
Beats Solo 3 not turning ON – Conclusion
In conclusion, if your Beats Solo 3 headphones are not turning on, there are a few troubleshooting methods you can try to revive them.
The most common cause is a dead battery or a malfunctioning power button. To check the battery level, press the power button and see if there is any LED activity.
If the battery is empty, charge the headphones for at least 3-4 hours. If the headphones still don’t turn on, the power button might be faulty and require cleaning with a WD40 spray.
A software glitch or bug can also cause the headphones to not turn on, in which case a hard reset or factory reset may be necessary.
Additionally, it is important to check for water damage or physical damage, as these can also cause the headphones to malfunction.
If none of the troubleshooting methods work, it may be necessary to seek professional help.