We all love our Alienware laptops. They’re fast, they look cool, and they’re perfect for gaming.
But sometimes, things go wrong. Imagine being all set for a game or some work, and then, bam! The keyboard doesn’t work.
I’ve been there. I own an Alienware m15 R4. One day, out of nowhere, my keyboard just stopped. I spent a lot of time trying to figure out what went wrong and how to fix this Alienware keyboard not working issue.
It was tough, but I learned a lot.
If your Alienware keyboard isn’t working, don’t worry. This article will help you fix your Alienware keyboard. I’ve put together everything I learned so you can fix your keyboard too.
Let’s get started!
Restart Your Alienware Keyboard
You might’ve heard the saying, “Have you tried turning it off and on again?” It’s a classic piece of advice, but guess what? It often works!
When you restart your Alienware laptop, a few things happen:
- Clears Temporary Glitches: Sometimes, little errors or glitches pop up. They can mess with how things work, including your keyboard. Restarting can wipe these glitches away.
- Resets Hardware Connections: The computer and the keyboard talk to each other. But sometimes, they stop “listening.” Restarting can help them reconnect.
- Frees Up Resources: Over time, laptops can get bogged down with too many tasks. Restarting can give your laptop a fresh start, making it run smoother.
So, before diving into more complex solutions, give your Alienware a quick restart. It’s like giving it a short nap. When it wakes up, things might just be working fine again!
Turn Off Filter Keys
Filter keys? Sounds fancy, right? Well, they are a feature in Windows, but sometimes they can be a sneaky cause of keyboard troubles. Let’s break it down.
What are Filter Keys? Filter keys are a built-in feature in Windows to help people who might accidentally press keys because of tremors or other motor control issues.
When filter keys are turned on, Windows will wait to see if you press a key for a bit longer before it thinks you mean it.
It’s kind of like having a guard that checks, “Did you really want to press that key?”
Why Can They Cause Trouble? If you accidentally enable filter keys (it can happen with certain key combinations), it might feel like your keyboard isn’t listening to you.
You press a key, expecting a quick response, but nothing happens – or it happens after a delay.
It’s not broken; it’s just being extra careful because of the filter keys setting.
Turning Off Filter Keys – Step-by-Step
- Open Control Panel: Click on the Windows Start button, type “Control Panel,” and select it from the list.
- Access Ease of Access: In the Control Panel, find and click on “Ease of Access Center.”
- Find the Keyboard Settings: Scroll down and click on “Make the keyboard easier to use.”
- Uncheck Filter Keys: Look for the “Filter Keys” option. If there’s a checkmark next to it, click on it to uncheck and turn it off.
- Save and Exit: Click on “Apply” and then “OK” to save your changes.
After doing these steps, your keyboard should respond as usual. If filter keys were the issue, this should sort things out!
Powercycle Your Alienware Laptop
Powercycle is just a fancy way of saying, “turn your laptop completely off and then on again.” But there’s a bit more to it. Let’s dig in.
Why Powercycle?
Unlike a regular restart, power cycling means shutting down your laptop, unplugging it (if it’s charging), and letting it sit for a minute or so before turning it back on.
This does a few helpful things:
- Drains Stored Energy: Laptops can hold onto a little bit of energy, even when they’re off. By unplugging and waiting, you ensure all that energy gets used up. This can reset things that might’ve been stuck or glitchy.
- Fresh Start: Powercycling can give your laptop’s hardware and software a true fresh start without any lingering issues from the last session.
- Resolves Minor Bugs: Some small problems are like bad memories for your laptop. Powercycling helps your laptop forget them and start over clean.
Why Is It Necessary?
Just like sometimes we need a good night’s sleep to feel refreshed, your laptop occasionally needs a complete break.
It’s a simple way to resolve issues that might not go away with a simple restart.
How to Powercycle – Step by Step
- Shut Down Completely: Go to the Start menu, click on the power icon, and choose “Shut down.” Wait until your laptop is fully off.
- Unplug Everything: If your laptop is charging, unplug the charger. Also, remove any external devices like USBs, headphones, etc.
- Wait a Bit: Let your laptop sit for about a minute. This gives it time to drain any leftover energy.
- Power It On: After waiting, press the power button to start your laptop.
Once it’s back on, check your keyboard. With a bit of luck, powercycling might’ve been the magic touch your malfunctioning Alienware keyboard needed!
Run Windows Keyboard Troubleshooter
Windows knows that sometimes things don’t go as planned.
That’s why it comes with built-in troubleshooters for various issues, including our current headache: the keyboard.

How to Run the Keyboard Troubleshooter: Step by Step
- Open Settings: Click on the Windows Start button and choose the gear-shaped icon (or type “Settings” in the search bar) to open up your computer’s settings.
- Navigate to System: Once in Settings, find and click on the “System” option.
- Go to Troubleshoot: Within the System settings, you’ll find “Troubleshoot” on the left sidebar. Head there.
- Access Other Troubleshooters: Now, look for and select “Other Troubleshooters.” This will present you with a list of available troubleshooting options.
- Find and Run the Keyboard Troubleshooter: In the list, you’ll see various options, including one for the keyboard. To its right, there’ll be a “Run” button. Click on it.
- Follow Along: The troubleshooter will begin its investigation. It might ask you some questions or make some suggestions. Follow the steps as prompted.
- Check the Findings: Once done, the troubleshooter will inform you of any issues it discovered and actions it took or recommends.
The keyboard troubleshooter can be a lifesaver in fixing your malfunctioning keyboard. Even if it doesn’t provide a direct fix, it can point you in the right direction.
It’s a handy tool to have in your problem-solving toolkit!
Update Keyboard Drivers
Drivers are the unsung heroes making sure all the parts of your computer talk nicely to each other.
But sometimes, they get outdated or go haywire, leading to issues like our pesky keyboard problem.
Let’s explore how updating or reinstalling them from Dell’s official support page can help.
Why Update or Reinstall Drivers?
Like all good tech companies, Dell occasionally finds bugs in their products. There was a known bug with some Alienware keyboard firmware, which rendered the keyboards useless.
If your laptop has this old, buggy firmware, it could be the reason your keyboard’s acting up.
But the good news is that Dell has released new drivers to squash that bug back in 2020.
Updating or Reinstalling Drivers – Step by Step

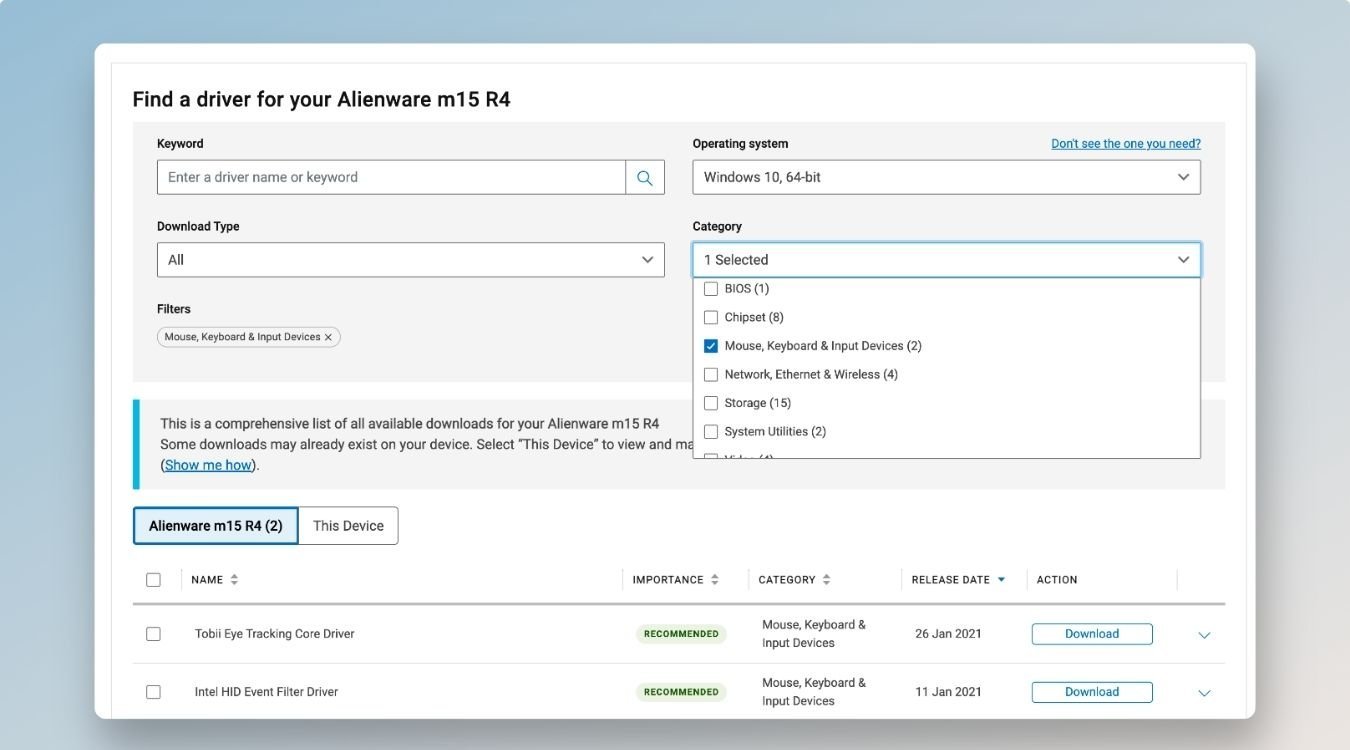
- Go to Dell’s Official Support Page: Open your web browser and head to Dell’s support page.
- Enter Your Laptop Model: Look for a search bar or option to enter your device details. Type in “Alienware m15 R4” or whichever model you have.
- Look for Keyboard Drivers: Once you’ve entered your device details, you’ll see a list of available drivers. From the category dropdown, check “Mouse, Keyboard & Input Devices” and you will get a list of drivers below.
- Download & Install: Click on the download link for the Intel HID Event Filter Driver. Once downloaded, open the file and follow the on-screen instructions to install.
- Restart Your Laptop: After updating or reinstalling, it’s a good idea to restart your laptop to make sure the changes take effect.
With the updated drivers, any old firmware causing issues should be a thing of the past.
Fingers crossed, your Alienware keyboard should be back in action!
Reinstall Drivers via Device Manager
Sometimes, your driver version is up to date but it is misbehaving due to some glitch.
Uninstalling and reinstalling the driver fresh can fix the issue and it’s actually pretty straightforward to do.
The Steps: Reinstalling Drivers Through Device Manager
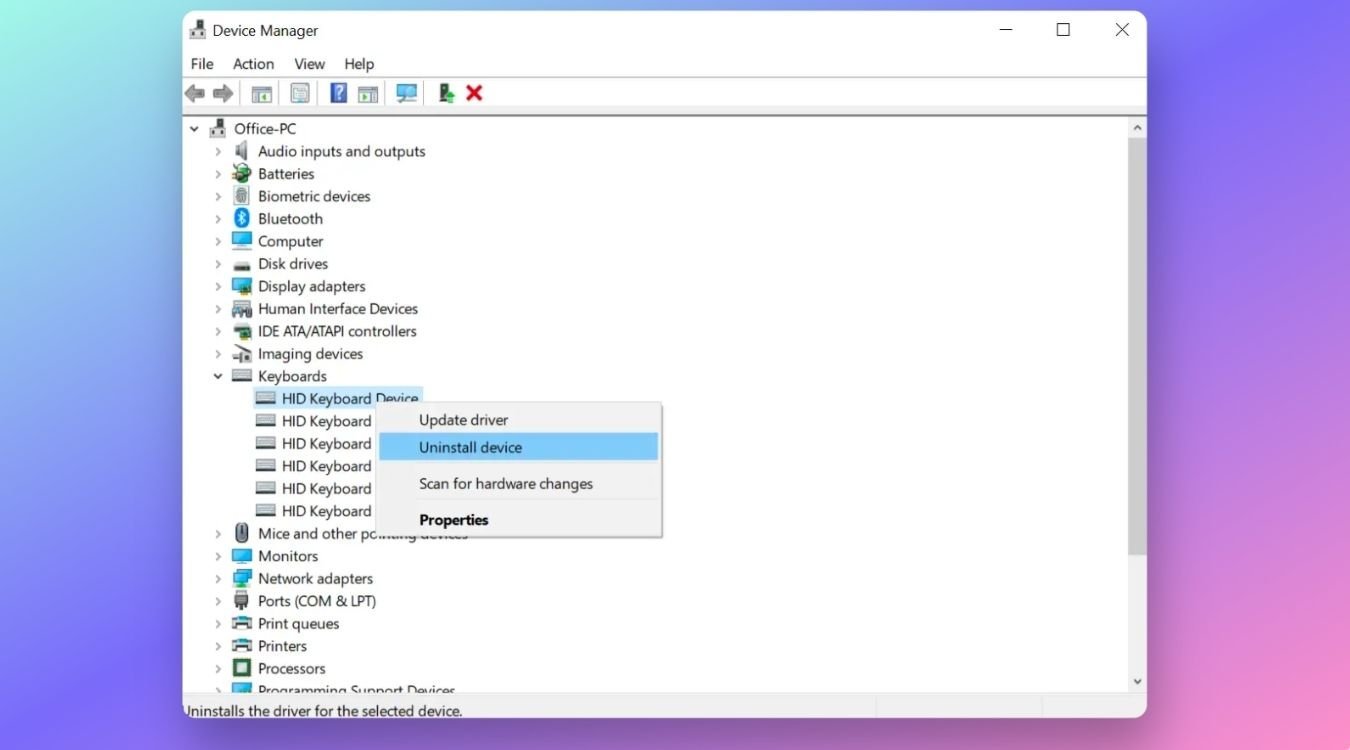
- Open Device Manager: Click on the Windows Start button, type “Device Manager,” and select it from the list.
- Find Your Keyboard: In Device Manager, you’ll see a list of hardware categories. Look for “Keyboards” and click on the little arrow next to it. This will expand the list to show your keyboard drivers.
- Uninstall the Driver: Right-click on the keyboard driver (usually named something like “HID Keyboard Device” or similar) and choose “Uninstall device.” A confirmation box might pop up; go ahead and confirm.
- Restart Your Laptop: Once you have uninstalled the driver, close everything and restart your laptop. No worries, you haven’t broken anything!
- Automatic Reinstallation: When your laptop boots up again, Windows will notice the missing driver and will automatically fetch and reinstall the right one for you. It’s pretty smart like that!
Once your laptop’s back on, your keyboard should hopefully be chatting happily with your computer again.
With those drivers freshly reinstalled, any hiccups caused by misbehaving drivers should be sorted out.
This works for external keyboards as I have recently also fixed my Logitech USB keyboard with this trick.
Check Power Management Settings
Laptops, especially high-performance ones like the Alienware series, try to optimize battery life wherever they can.
One method is to power down or put in low-energy state any hardware that’s not actively being used, like the keyboard.
But occasionally, this can lead to the device not “waking up” properly, causing it not to respond as it should.
To fix this, follow the below steps.
- Open Device Manager: Click on the Windows Start button, type “Device Manager,” and select it from the dropdown.
- Locate the Keyboard: In the Device Manager window, you’ll find a category named “Keyboards.” Click on the arrow next to it to expand the list and reveal the drivers related to keyboards.
- Right-click and Head to Properties: Find the main keyboard driver named HID Keyboard Device. Right-click on it and select “Properties” from the context menu.
- Navigate to Power Management Tab: In the properties window, you’ll find various tabs. Look for the one labeled “Power Management” and select it.
- Deselect the Power Saving Option: Here, you’ll find a checkbox with the option “Allow the computer to turn off this device to save power.” If it’s checked, uncheck it. This will ensure that your computer won’t try to save power by turning off your keyboard.
- Apply and Restart: Click on the “Apply” or “OK” button to save changes.
By telling your computer not to power down the keyboard to save energy, you might prevent any future keyboard “sleepiness” and keep your typing experience smooth and responsive!
Update Alienware BIOS
The BIOS (Basic Input/Output System) is a fundamental piece of software that interfaces between your computer’s hardware and the operating system.
If it’s outdated or has a bug, it can affect several components, including the keyboard.
Manufacturers often release BIOS updates to rectify such bugs, optimize system performance, or add compatibility with new tech.
Steps to Update the Alienware BIOS:
- Safety First: Before you dive in, ensure your laptop is plugged into a power source. A BIOS update is one task you don’t want to be interrupted by a drained battery!
- Visit Dell’s Support Page: Navigate to Dell’s official support website. Once there, enter your Alienware model number (e.g., m15 R4) or use the automatic detection tool.
- Look for BIOS Updates: In the drivers and downloads section for your specific Alienware model, look for the category named ‘BIOS’. Check if there’s a newer version than what’s currently on your laptop.
- Download and Install: Click on the ‘Download’ button for the latest BIOS update. Once downloaded, double-click on the file to initiate the update process.
- Follow On-screen Instructions: The BIOS update process will guide you with on-screen prompts. Follow them carefully, and never turn off your computer during the update.
- Reboot: Most BIOS updates will require a system restart to finalize the installation. The system might take a little longer than usual to boot up post the update; this is normal.
A Cautionary Note: While updating the BIOS can be a solution to many underlying issues, it’s also a sensitive operation.
Always ensure you’re downloading the correct BIOS version for your exact model. An incorrect or interrupted update can potentially harm your system.
Contact Dell’s Support Team
Sometimes, despite our best efforts and all the tricks up our sleeves, tech issues can be stubborn.
If you’ve worked through every solution and your Alienware keyboard still isn’t responding, it might be time to call in the pros.
Dell’s customer support team is trained to handle precisely such dilemmas. You can contact Dell support team via their dedicated support page.
Alienware Keyboard Not Working – Summary
Every tech product, even top-tier brands like Alienware, can occasionally face hiccups. Our guide addressed these challenges, providing solutions to bring your keyboard back to life.
Quick Actionable Points:
- Restart the Keyboard: Often, a basic restart does the trick.
- Filter Keys: Toggle them in “Ease of Access” settings to prevent interference.
- Powercycle the Laptop: Fully power down and restart to refresh connections.
- Driver Updates: Get the latest from Dell’s driver support page or reinstall via Device Manager.
- Windows Troubleshooter: Use the System > Troubleshoot > Other Troubleshooters path.
- Alienware Command Center (AWCC): Check and adjust keyboard settings.
- Power Management Adjustments: Ensure power-saving isn’t affecting the keyboard.
- BIOS Update: Ensure you have the most recent version for system compatibility.
- Contact Dell Support: When in doubt, reach out to the experts.
Armed with these steps, Alienware users can confidently address any keyboard concerns and continue their smooth computing experience.